Pages

Wednesday, October 30, 2013

...Extreme Pumpkin Carving.

Every year at work we have a Pumpkin Carving Contest.  Ahem, make that a Carved Pumpkin Contest.  No knives at work! Also no candles!  They give out four prizes for the best pumpkins, and everyone eats candy and pizza all day.  I look forward to it all year (update: there's no pizza this year).  Last year I brought in the exact same pumpkin that someone else carved.  A mean-looking pumpkin with a pantleg attached to a shoe coming out of the mouth, red paint for blood.  This year, I wanted to try something different.  It is time for some extreme pumpkin carving.  Instead of cutting some holes in it this time, I'm going to attempt to "sculpt" it.  Future me is laughing at myself right now.

I'm not sure what I'm getting myself into.  The only designs I can find online are extremely elaborate original pieces of art that I could never, ever replicate.  I guess at least I won't bring in the same pumpkin as a coworker this year.  It just may also be a really awful pumpkin.  Future me is nodding.

I wish I could carve like this guy.  I never had a chance.

I bought a basic sculpting kit online for about $8.00, really for only the clay loop tool.  That's what the pro's seem to use...though the one in the kit is very small and isn't going to make it go as fast as I hoped.  Not at all fast.

Gutting the pumpkin.
So I started sculpting with the tiny pumpkin knife and tiny clay loop.  It was a slow process removing the skin from the pumpkin.  It didn't just scrape off like I expected.

After like an hour of scraping.  Okay not really an hour.

I could already tell this would be a disaster.  I just wanted a cool pumpkin.  Just wanted to be different.  So I kept on scraping away the surface so I could start sculpting the soft pumpkin flesh.

Eyebrows?

No.  No eyebrows.  I tried and tried to make it look like a face.  The pumpkin did not want to have a face.  Pumpkins do not peel smoothly when you scrape them.  I kept making it more and more stringy, and I was getting more and more sad.

I guess there's a nose in there.

And then I hit this point when I was carving where I looked at the pumpkin and thought, "Wow.  This thing looking up at me is super creepy."  So I went with it, and somehow I ended up with this.


It may not have the clean lines and defined shape of the beautifully carved pumpkin above, but I guarantee this:  my pumpkin will be the only one like it.


Some creepy  hair?  Heck yeah.

And if this is not one of a kind, well then I just give up.

At the very least I hope the children are scared.

Happy Halloween, everyone!

Monday, October 28, 2013

...Homemade Halloween Costumes - Part II

I started this whole project without a real plan.  No costume patterns, no measurements, and really I only had one shot to make Bob the Tomato and Larry the Cucumber fit onto actual people.  Since I did not have a ton of extra fabric, or any children in my possession while I sewed the costumes, I was a little nervous all my time and effort would go unworn on Halloween night.

Making the hats went surprisingly well, and I was thrilled with the results.  Just look at these cute boys...


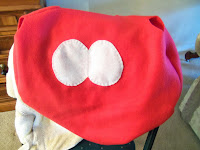
...but I had to move on to the hard part.  The actual costumes.  I started by guessing how tall and wide an almost-one-year-old is.  Guessing where his baby arms come out of his torso.  How wide I need to make the neck to fit over his baby head.  It all was a ton of guessing.  I knew the tomato needed to be round, and it needed to be red.  I sewed together two round pieces of fleece and left spaces open at the top, bottom, and sides.

Baby legs are a lot chubbier than I allowed room for!

When it came time to try it out on the baby, though, there was no way he was letting me force that thing over his head.  Consequently, I decided that open-back costumes were the way to go, and I would have to find some other way to keep the costumes attached to the children.  Superglue, perhaps.  So I cut down the back of the fabric and slipped it on him.

Larry the Cucumber was a little more difficult to figure out, because this costume would go on a child who needs to walk.  My first try-on session basically put him in a green fleece form-fitting evening gown (try to picture that).  He couldn't move.  Luckily I had enough fabric to widen the costume a bit so he could actually walk around.

For the faces I used a dollar's worth of black and white felt (yes, a dollar!), sewn onto the fleece with needle and thread, the old-fashioned way.  This turned out much better than if I had tried to round those pieces with the machine, although you can see where the thread is this way...


For the noses, I sewed two little circles together and cut open the back to flip it inside out.  They were stuffed with scraps from the rest of the project and also hand-sewn onto the bodies.  Three-year-old Larry the Cucumber thought the nose was funny and tried to pull it off.  Not on my watch, kid.  Not on my watch.

Chairs make good test subjects.  If it fits a chair, it fits a child, I always say.

I ended up getting a preview of the final costumes before Halloween, when the kids went to a nearby Harvest Festival.  I gotta say, I was satisfied!  Although my sewing was not professional in the slightest, and my measuring was done with no measuring devices whatsoever, and it took forever to get smiles out of these boys...Bob and Larry were the cutest vegetables I'd ever seen.  Wouldn't you agree?

Before the finishing touches...


 And after...


Oh, and I ended up using Velcro, by the way.  I guess parents frown upon supergluing costumes directly onto their children.  Oh well!


...Oreo Pumpkin Mini Cheesecakes

I am running out of time to accomplish my Halloween to-do list.  Thankfully, though, no one volunteered for snack this week for our softball team, so I thought I'd go for round two of trying to impress them with desserts, and simultaneously check Halloween Item #3 off my list.  I desperately wanted to bake a cute Halloween treat this year.  I also desperately wanted to eat a cute Halloween treat, which is why I needed to get rid of said treat by bestowing it upon my deserving team.  Otherwise, I probably would have eaten about sixteen of these little desserts by the time Halloween rolled around.


League Champions.

Now I'm not a huge fan of pumpkin.  I actually very much dislike pumpkin pie.  But I do love cheesecake, and if you're like me and don't absolutely adore pumpkin flavored foods, this is a good way to still participate in all the seasonal eating.  You know you want to!  These mini Oreo Pumpkin Cheesecakes are both cute and only slightly pumpkin-flavored, the perfect Intro to Pumpkin dessert.

The recipe was actually quite simple until the end.  It literally took only a few minutes to prepare before baking, and most of the ingredients were things I had on hand.  Last week I picked up some Halloween-colored Oreos and a little cream cheese in anticipation of this dessert, and after work yesterday I called home just to check on the status of those items I had purchased.  Sure enough, Gramps and his friend had found and eaten half of my stash of Halloween Oreos, and they got into the cream cheese as well, so I made another trip to the store.  All out of Halloween Oreos!  Luckily I was able to find some store-brand sandwich cookies with orange filling, so I used about half of each.

I made a double batch, because who makes just twelve of anything delicious?  When something looks good, always make extra.  They will get eaten.  Here's what you need for 24 mini-cheesecakes.


Ingredients:
2 packages cream cheese
1 cup sugar
1 teaspoon vanilla 
1 (or less) cup canned pumpkin mush
2 eggs
1/2 teaspoon cinnamon
1/4 teaspoon nutmeg
4 tablespoons flour
2 pinches salt
24 Halloween Oreos (or just "sandwich cookies" if your family ate your Oreos)
Chocolate/white chocolate chips

Start out by preparing your cupcake pans.  Line them with wrappers and place a single Oreo in each space.  I don't know if a spritz of cooking spray would help (as with every cooking question I have, Google says both yes and no), but mine stuck to the wrappers a little at the end.  Your call.  Preheat the oven to 325º F.

My lovely assistant.

The best part of this recipe, in my opinion, is that you only need to dirty one bowl.  Just make sure it's a big bowl.  Soften your cream cheese and mix your sugar in.


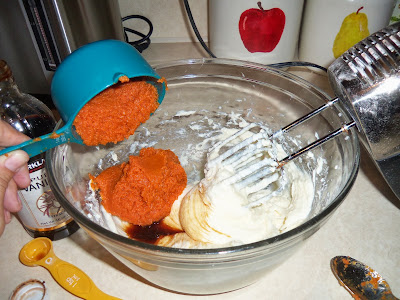
Then add basically the rest of the ingredients!  Vanilla, pumpkin, egg, cinnamon, nutmeg, flour, and salt.  Mix it all together in your giant bowl.  Your cheesecake batter is complete!  See?  Simple.  The other great part about this recipe is that before you bake it, it's not delicious like cookie dough, so you don't eat half of it before you get it into the oven.

Add ingredients.
Mix ingredients.
Voila!
Spoon the batter into each cupcake wrapper, filling them about 3/4 of the way up.  After they are all filled you can add the rest in to even them out.


Mine took about 23 minutes to bake, and I put both pans in at once.  I didn't have any problem with it this time, but in the past I have ended up with a sheet of burnt cookies up top and doughy ones on the bottom.  You may want to play it safe it bake one batch at a time.  But again, I don't like waiting, so all into the oven at once!


After they're finished baking, let the cheesecakes cool for a bit and take them out of the pans.  You can take them out of the wrappers now if you want, but I found when I took one out, a lot of the cheesecake stuck to the wrapper.  This won't happen as much after you chill them.  My advice:  leave them in the wrappers until they're ready to eat, especially if you have cute wrappers.

Melt about 1/3 cup of chocolate or white chocolate chips in the microwave.  Don't burn them!  Stir every 10 seconds or so.  If you have a bag for piping chocolate, use it.  I cut the tip off a Ziploc bag, and boy was it messy until I got the hang of it.  Pipe concentric circles onto the cheesecakes, and use a toothpick to spread them out from the middle into spiderwebs.  Or what I found to be easier, was just to start in the middle and spiral outward instead.

Messy with concentric circle strategy.
 I was a little worried after I started piping the chocolate.  It looked a mess.  It felt a mess.  It was a mess.  My plastic baggy was not cut very well.  The opening was too wide and the chocolate sort of just plopped onto the cakes.  I was not impressed.  Something needed to change.

Always post the pictures after people have eaten what you made.  Sorry guys.  It was messy. 

So instead, I used the white chocolate.  I cut the tip of the bag ever so slightly.  The smaller the better.  You'll get much better line quality with the small tip, and your spider webs will actually resemble webs!

Smaller opening on the bag, spirals.  Much better!
I was thrilled with the white chocolate chip webs, and I knew then I had to fix the other ones.  I piped right over the regular chocolate webs, and it actually created a pretty cool look.  I was not disappointed.

And the best part?  "What?  There's an Oreo inside?!"  Yeah there is.


Surprise!

Friday, October 25, 2013

...Homemade Halloween Costumes - Part I

Every year around this time I begin scrounging for some semblance of a costume to wear for Halloween.  It's never that I have somewhere to go that requires one, I just hate letting go of all those wonderful years of trick-or-treating, the cute homemade kids' costumes, and the days when pillowcases full of candy did not turn immediately to extra pounds upon my belly (that's what we all miss most about childhood, isn't it?).

When we were little, our parents put together awesome Halloween costumes for us.  It is a lot easier to dress up a child, and a lot less money.  Kids are cute in anything, and depending on the age, don't care as much about looking silly.  Case in point, me and my brother rocking the camo:


The ladybug:


The creepy clown and boy Raggedy Ann:
Okay, so not all kids are cute in anything.

As I got older, and my parents stopped making us homemade costumes, I had to start figuring out my own makeshift Halloween disguises.  They also had to be free, since I was still technically a child.  Some of my not-so-proud moments in costume-making include (sorry, no pictures):

-The Bathroom Bandits  A group of us at a youth group Halloween party put toilet seat covers around our necks, applied some warrior-like face paint, carried a few rolls of toilet paper...and then went trick-or-treating.

-Dead Cowgirl  Because I could only find a cowboy hat that year, but with pale makeup and extra eyeliner under the eyes.

-Deerhunter / Person in the Army  My dad's camouflage jacket.  Jeans.  Yes, the costumes were getting worse every year.

Creative, right?  So now that I'm all grown up, maybe it's time I start making those awesome little kid costumes that actually require forethought and real supplies.  My friends have two little boys who love Veggie Tales, so what better costumes than Larry the Cucumber and Bob the Tomato.

All great costumes start on a tiny piece of paper on a very cluttered desk.

I had a coupon for Jo-Ann's just begging to be used, so I headed over there after work.  Twenty minutes and twelve tiny dollars later, I had three yards of fleece (one red, two green) for the bodies and four sheets of black and white felt for the faces.  Bob and Larry are simple vegetables, after all.  I was really excited about this project.  I pulled out Grandma Judy's sewing machine the next morning and got to steppin'.


I didn't have a costume pattern.  I was going to wing it.  One thing I knew though was that I wanted the boys to have little hats to top off the costumes, because let's be honest, kid hats are so cute.  I found a free little hat template online at Tracy's Treasury and printed out a couple copies.  I had to cut them smaller to child-size them, because my printer wouldn't reduce the print size, but it worked great anyway.


Easy paper templates, anyone can do it!

Once I had all the fabric cut down to size, it was time to start assembling the hats.  Sew the front two triangles together, and sew the back two triangles together.  Larry's hat didn't require any special toppings, so his was a little simpler.  For Bob, though, I really wanted the cute little stem and leaves.  Those need to be pinned in between the front and back panels before you sew them together...right sides facing, of course. Sew them together and flip right side out.

Inside out hat and some unsewn earflaps.
Leaves and stem sewn in.

Sew your two earflap pieces together along the curvy side, and measure the distance around the base of the hat to determine where you need to sew the ends together.  Larry's needed a little adjusting, as the earflaps were somehow both toward the back of the head, so his has a little seam down the front and back of that piece where I had to remove extra fabric.  Bob's fit perfectly around the hat.  Again with right sides together, sew the earflap piece around the outside base of the hat, then flip right side out.

Before

After

It's that easy!  Three or four seams on the machine and you're done!  The hats turned out so cute, I knew I had to go all out on the actual costumes, but you'll have to wait a couple days to see if it all comes together in time for Halloween.


Monday, October 21, 2013

...Stuffed Red Onions.

Everywhere you look these days, people are stuffing one type of food inside another type of food!  The food-inside-food (-inside-food) you've all heard about is the Turducken, but it has spread far and wide, and now there are entire websites devoted to foods inside other foods.  Being the food-obsessed American that I am, I have to stay current with the trends, and I don't think this trend will end any time soon.

This is one of those dinners you cook to show off your skills in the kitchen.  Like many fancy meals, a simpler version would taste just as good and use up a lot less of your precious time.  But hey, what kind of blog would that be...

May I present to you Stuffed Red Onions.  The recipe was adapted a smidgen from this one here at Epicurious, but probably not enough to call my own.  Nevertheless, here is how I made these brightly colored orbs of flavor.  As always, I tried to make the meal healthier than the original.

For the onions, you'll need:

-Red onion (one per person you plan to impress, this recipe makes 3-4)
-Package of lean ground beef
-1/4 cup olive oil
-Two cloves garlic (or a few shakes of freeze-dried garlic from a bottle)
-Salt and pepper
-Oregano, mint, dill, bay leaves (I didn't have mint or bay leaves, use what you have)
-Diluted white vinegar (because I didn't have white wine)
-Healthy brown rice, cooked (about 1/4 cup per onion)
-Half a lemon

Put a large pot of salted water on the stove and set it to boil.  While that's heating up, peel and trim your onions.  Get rid of that outer layer of papery skin, cut off the stem, rinse off all the junk that has been sitting on your onions since you bought them a few weeks ago.  Now that your pretty purple onions are looking their best, cook them in the boiling water for about ten minutes so they can soften up.

Remove them carefully.  They will be hot!  Wait a few minutes, then slice one side open from top to bottom, cutting through two or three layers.  You may have to work at it a little while, but try to pry the onion open enough to remove the insides without breaking the outer layers.  Set your hollowed out onions aside for now.


Because we hate to waste food, chop up the insides of the onions until you have about 1/2 cup.  Seal up the rest for later use.  In a large frying pan, heat up a few tablespoons of olive oil and toss in your chopped onions, along with your choice of garlic.  I never have fresh garlic on hand, but there's always an abundance of freeze-dried garlic or garlic powder.  It all works.  If there's one thing I've learned in my attempts to cook new food, you can pretty much sub anything you have for anything you don't have.  I mean, sure there are limits (don't go substituting salt for sugar), but I still can't tell you the difference between most herbs. 

Let it sizzle until your kitchen smells wonderful.
Cook the onion and garlic for a few minutes, add a teaspoon or so of salt, as well as any herbs you've gathered up, and then you can start to cook the meat.  Let the meat cook through.  If you read the ingredients, you've already prepared your rice, or at the very least you're in the process of microwaving your frozen 3-minute Costco brown rice.  I never use any other kind!

Add a few squeezes of your lemon and a drizzle of vinegar.  Like I said, it's all about the ingredients you have.  Google will tell you what kind of ingredients work in place of the ones you forgot to buy.  No, I didn't have white wine, and yes, my version probably ended up tasting a little different than the original, but guess what, I didn't care and neither did anyone else!  Add in your cooked rice and stir it all together.  Now is the time to taste test.  If your meat doesn't taste good now, it's not going to in the end.  Season accordingly.


Preheat the oven to 400° F and grab the onions you prepared earlier.  Now instead of hot onions, you have to be careful with the meat mix.  It goes straight from the frying pan into the onion that now sits in the palm of your hand.  Fill each onion with about 1/2 cup of the mix and place in a baking dish.


Drizzle with oil and lemon juice (and white wine if you have it).  I topped mine with some reduced fat cheese, because cheese makes everything better.


Cook the onions for about 30 minutes.  They should be browned and crispy on top.  The original recipe says to serve them hot or at room temperature.  I don't know about you, but I don't like room temperature meat.  My recommendation is to serve them hot, like normal dinner is served.

We've got a non-cheese eater among us.

Plate that onion and garnish with something leafy and green.  Because I only made three onions, there was a pretty good amount of leftover beef.  I served that on the side as well, because we can eat.


Remember how I said a simpler version would taste just as good?  Well I still stand by that, since no one was man enough to eat the actual onion shell.  But a plate of meat'n'rice scramble just can't compete with the beauty of an entire roasted red onion filled with the same stuff, topped with toasty cheese.  There really is no comparison.